

We had recently noticed several changes and additional features to the Blogger layout. One of the notable and much welcomed change is the ease of adding a picture banner or image to the Blogger Header, as highlighted by our reader, dumper. The new steps covered in this article will supercede the previous articles titled “Background image for Blogger Header” and “Add Picture Banner Link to Blogger Header.” Those previous methods of putting the background image are still valid and effective. However, for many new bloggers who are not too familiar with coding, we think that using the latest feature by Blogger is an easier way of creating the Header image.
Do note that when you use this feature, the image will appear as a background to the Title and Description. If you want a picture on one side of the Header and the Title and Description beside the picture, we think it is still better to use the methods described in the article “Add Picture Banner Link to Blogger Header” as that will give you better control over the position of the various elements. You can also refer to our article in our FAQ showing you how to have a picture beside the Blog Title and Description.
Insert Header image
We assume that you have a ready picture that you would like to place in your Blogger Header. Edit the picture, touch up, and resize using photo editing softwares. You can download the free Google's Picasa or Irfanview if you don't have one. Save the picture in your computer or upload it onto an image server.
Login to your Dashboard. Go to Template -> Page Elements. Click to Edit your Header.
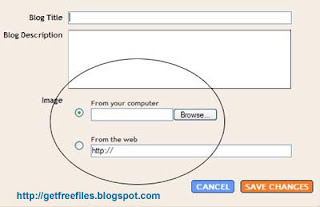 You will see that you can now upload an image onto your Header either from your computer or from the web. After uploading the image, Save the changes and View your Blog. If you are happy with the picture, go back to Edit your Header again.
This time, you will see under the image further options on “Placement” of the image.
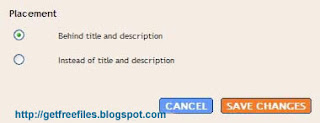 If you choose “Behind title and description”, the image will appear as a background and whatever you type as your title and description will be visible on the face of the image. With this option, only the title links to your main index page but the image does not.
If you choose “Instead of title and description”, you will see only the image and the title and description are hidden from view. However, with this option, the image is clickable and automatically links to your main Blog page.
Align image to Left or Right
Update: We have a more detailed guide on alignment of the Title, Description and Header background images. In the articles, we discussed how you can move them to the center, or towards the left or right of the Header. Follow the guide on Header Image and Title Alignment (I) if you are using the Minima, Denim, Rounders, Herbert, Jellyfish, Harbor and Scribe template. Go to Header Image and Title Alignment (II) if yours is a Dots, No. 897, No. 565, Thisaway, Moto, Snapshot, TicTac, Tekka, Sand Dollar or Simple II template.
To have an image aligned to the left of the Header, go to Template -> Edit HTML, look for the Header image style and change it to the following words (in purple):-
Similarly, if you want the image to appear to the right of the Header, it would be “margin-right: 0px;”.
This is applicable where the image replaces the Title and Description. If you retain the Title and the image is a background to the Title, the image will follow the position of the Title. To have the picture on one side of the Header and the Title and Description next to it, you may want to follow the guide in the article “Add Picture Banner Link to Blogger Header”.
Remove border around Header
If you see a border around the Header image that somehow does not go with the image, you can either change it or remove it. Go to Template -> Edit HTML, and you will see somewhere near the top a style defined for the #header-wrapper and #header. There is a setting for the border. An example is this:-
This border has a width of 1px, a thicker “solid” line instead of a “dotted” line, and a bordercolor that is defined under Template -> Fonts and Colors.
To remove the border, either delete this setting entirely or change the 1px to 0px width. Preview the template and if you like what you see, save it.
Further Reading:
This guide will give you an image background. Sometimes, you may have more than one image, all of which are suitable for your Blog. You can read Random Header and Background Images on how you can have the Header images rotated and a random image shown upon every page load.
Should you want to have a background picture as a backdrop to your main post, sidebar or whole blog, you may refer to the article on "Background Image for Blogger Template."
Do note that when you use this feature, the image will appear as a background to the Title and Description. If you want a picture on one side of the Header and the Title and Description beside the picture, we think it is still better to use the methods described in the article “Add Picture Banner Link to Blogger Header” as that will give you better control over the position of the various elements. You can also refer to our article in our FAQ showing you how to have a picture beside the Blog Title and Description.
Insert Header image
We assume that you have a ready picture that you would like to place in your Blogger Header. Edit the picture, touch up, and resize using photo editing softwares. You can download the free Google's Picasa or Irfanview if you don't have one. Save the picture in your computer or upload it onto an image server.
Login to your Dashboard. Go to Template -> Page Elements. Click to Edit your Header.
 You will see that you can now upload an image onto your Header either from your computer or from the web. After uploading the image, Save the changes and View your Blog. If you are happy with the picture, go back to Edit your Header again.
This time, you will see under the image further options on “Placement” of the image.
 If you choose “Behind title and description”, the image will appear as a background and whatever you type as your title and description will be visible on the face of the image. With this option, only the title links to your main index page but the image does not.
If you choose “Instead of title and description”, you will see only the image and the title and description are hidden from view. However, with this option, the image is clickable and automatically links to your main Blog page.
Align image to Left or Right
Update: We have a more detailed guide on alignment of the Title, Description and Header background images. In the articles, we discussed how you can move them to the center, or towards the left or right of the Header. Follow the guide on Header Image and Title Alignment (I) if you are using the Minima, Denim, Rounders, Herbert, Jellyfish, Harbor and Scribe template. Go to Header Image and Title Alignment (II) if yours is a Dots, No. 897, No. 565, Thisaway, Moto, Snapshot, TicTac, Tekka, Sand Dollar or Simple II template.
To have an image aligned to the left of the Header, go to Template -> Edit HTML, look for the Header image style and change it to the following words (in purple):-
#header img { margin-left: 0px; |
|---|
Similarly, if you want the image to appear to the right of the Header, it would be “margin-right: 0px;”.
This is applicable where the image replaces the Title and Description. If you retain the Title and the image is a background to the Title, the image will follow the position of the Title. To have the picture on one side of the Header and the Title and Description next to it, you may want to follow the guide in the article “Add Picture Banner Link to Blogger Header”.
Remove border around Header
If you see a border around the Header image that somehow does not go with the image, you can either change it or remove it. Go to Template -> Edit HTML, and you will see somewhere near the top a style defined for the #header-wrapper and #header. There is a setting for the border. An example is this:-
border: 1px solid $bordercolor; |
|---|
This border has a width of 1px, a thicker “solid” line instead of a “dotted” line, and a bordercolor that is defined under Template -> Fonts and Colors.
To remove the border, either delete this setting entirely or change the 1px to 0px width. Preview the template and if you like what you see, save it.
Further Reading:
This guide will give you an image background. Sometimes, you may have more than one image, all of which are suitable for your Blog. You can read Random Header and Background Images on how you can have the Header images rotated and a random image shown upon every page load.
Should you want to have a background picture as a backdrop to your main post, sidebar or whole blog, you may refer to the article on "Background Image for Blogger Template."

To what do I resize my image to for the background of the header? I want the image to fill the full frame of the header, at the moment it either fills the left side with a gap on the right side when I choose size to fit, or it overshoots the right side of the entire blog on the right when I choose the not to fit. I am using the denim wide template. Any suggestions?
Thanks, Amy
Post a Comment